Search The SAP Consultant
Wednesday, April 21, 2010
SAP’s SME Solutions – A Guide to the Product Portfolio
Thursday, November 26, 2009
Queries
Would really appreciate if you can post your queries on the forum rather than the comment section of this blog. This will allow other users also to give their input. And I will try to respond to all the queries as soon as possible.
Once again, Thank you very much for all your support.
Sunday, September 28, 2008
Simple SAP workflow
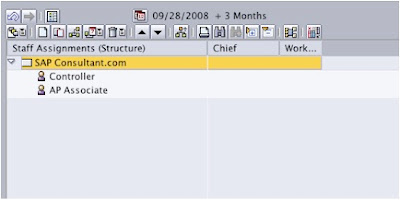
Step 1 - Define organization structure for approval process
Use transaction PPOCE to define the organization structures and positions needed for Approval. The positions defined here would be assigned to the approval paths later. Users would be assigned to each position.
Step 2 – Create workflow variant
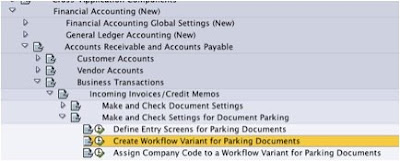
Use the menu path shown below to create a workflow variant

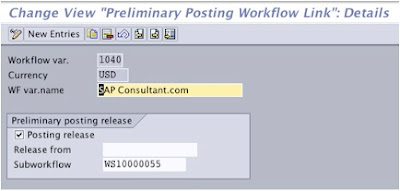
Make sure to activate the “Posting release” tick (This makes sure that each parked document should be released to be posted). The option “Release from” can be used to define a minimum amount from which the release procedure should be activated.
Step 3 – Assign the workflow variant to company code
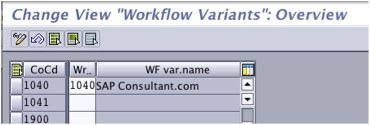
Assign the variant created above, to the company code.

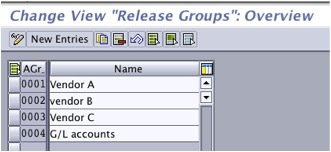
Step 4 – Create approval group
Approval groups can be assigned to customer or vendor master data. This will then be used to determine the approval path along with the document types.

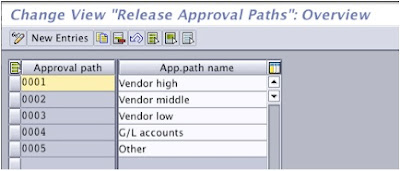
Step 5 – Define approval paths
On this step, define the approval paths for approval procedure. Approval path along with workflow variant would determine the Approval steps, amount limits and the approvers.

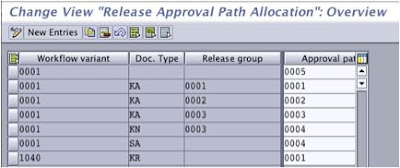
 Step 6 – Determine approval paths
As I said before the approval path would be determined based on accounting document types and the approval groups maintained on customer/vendor master data.
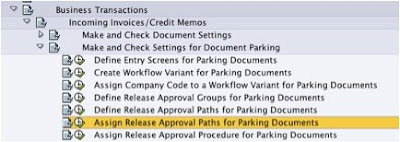
Step 7 – Assign release approval procedure
On this step we would determine the level of approval needed for the given workflow variant, approval path and amount combination. Depending on the approval level needed, we would assign the relevant sub workflow template.
For a one level approval, sub workflow template WS10000052 would be used. For a two level approval, template WS10000053 would be used. For three level approval, template WS10000054 would be used.

Step 8 – Assign approvers
On this step, the positions created on step 1 would be assigned to the appropriate approval paths.

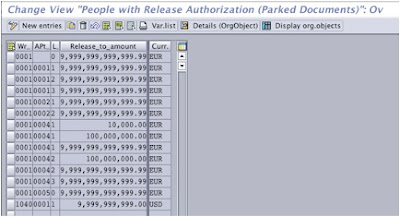
Click on "Details (OrgObject) to assign the approvers

Finally link the workflow variant WS10000051 to the event FIPP – CREATED using transaction SWETYPV.

That’s it. You have configured the basic workflow for the accounting document approval procedure. Now every time a document is parked, a SAP message would be generated and sent to the appropriate approver
Approver can use transaction SBWP to view the messages and approve or reject items.


I hope this post would have given you a basic idea about SAP workflows. Would really appreciate your comments.
Wednesday, December 05, 2007
New address - www.thesapconsultant.com
Thank you very much for visiting my blog. I hope that I have been helpful in someway to you. And now I'm really happy to inform you that, from today you can visit my blog using the new URL www.thesapconsultant.com
Please keep on visiting my site for future updates. Thank you very much for your support and would really appreciate your feedback.
With best regards
Shathees Loganathan
Friday, November 24, 2006
Profit center balance sheet
On this post I would like to look at how the system has been designed to transfer balance sheet items to profit centers using the transactions 1KEH, 1KEI, 1KEJ, 1KEK. Often I have come across situations where the total balance of balance sheet accounts on a report painter report based on the library for GLPCT doesn’t match with the total of the line items on the called up report. This is not a Bug rather this is how the system has been designed.
Friday, October 06, 2006
SAP Business Transaction Events
Next we have to find the process interface for duplicate invoice check! To do that, follow the following steps.
- Select the menu as stated below

- Execute the info system as stated below
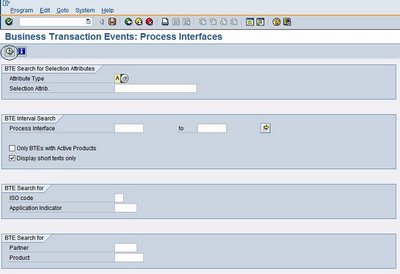
- All the processes will be shown below

- Select the process 1110 and click on “Sample function module” as stated below

- Copy the sample functional module “SAMPLE_PROCESS_00001110” and create “ZSAMPLE_PROCESS_00001110”. Put the customized logic in the functional module “ZSAMPLE_PROCESS_00001110” and activate it!

- Now go back to FIBF and execute the menu as shown below

-
Define a new product and activate it

-
Now go back to FIBF and execute the menu as shown below

- Assign the function module “ZSAMPLE_PROCESS_00001110” to the process “1110”and the product that was defined in the earlier step.

-
Bingo!!!!!! Now every time when a vendor invoice is being posted the invoice check will be carried out using the custom logic built into the function module “ZSAMPLE_PROCESS_00001110”. But make sure that the “double invoice check” tick has been put on the relevant vendor masters!
Sunday, April 02, 2006
Allow the company to grow!
Thank you very much for all your comments.
This time I would like to give a small tip. In a business environment, all the companies will eventually grow. A well thought out ERP implementation will never give any problems when the company would like to expand its operations in the future.
For example, we all know that more than one company codes in SAP can be grouped under one controlling area for management accounting purposes. If a controlling area has the currency type company code currency, it’s not possible to have company codes with different local currencies under that controlling area. So if a new company with different local currency has to be added to the same controlling area in the future, it would be impossible.
So it’s always critical to look into future expected development of the company and give room for it when an ERP is being implemented. After all an ERP should never be a bottleneck for the company’s growth.
I wanted to share this with you since I had come across this issue with one of my new clients. I hope this tip would be useful to you.
Tuesday, December 06, 2005
Reports on SAP
1. SAP Easy Access Report Selection
SAP Area menu SAP1

2. SAP Easy Access Info Catalog
SAP Area menu SAP2

I hope the above SAP Area menus would help you to explore and utilize the standard reports provided by SAP. Please feel free to send me your comments.
Tuesday, November 29, 2005
The concept of Table buffers – For functional consultants – Part one
Today I’ll talk about the concept of table buffers on SAP. This topic is pretty interesting and gives certain implications on ABAP programming model. I think it’s really useful to the functional consultants to have certain amount of knowledge on this subject.
As we all know, a well developed ERP system should try to optimize its performance by using every possible way. Especially the response time it takes to process the requests from the business user should be minimize as much as possible. By taking this factor into consideration SAP has designed the concept called ‘Table buffer’.
This concept has been developed by considering two main factors.
1. The network traffic between the application server and the database server
As I explained on my earlier posts the SAP database server and the application server can be located on two different physical servers. So every time the application server requests some data from the database, it should be transferred through the network from the database server to the application server which may lead to high network traffic on a typical SAP installation where multiple requests will be passed per second. This factor would slow down the system.
2. The database load
When the programs processed by the application server, directly deal with the tables on the database to manage the data, it increases the database load which will slow down the database’s performance. This will affect a program which uses a specific table in the database as well as other programs which try to use some different tables in the same database.
Solution for the issue
The concept of table buffer simply load the data of a database table into the application server’s RAM. So the programs would access the data from the application server’s RAM rather than directly from the database table.
By buffering data, we increase performance in two important ways:
1.The programs using the buffered data run faster because they don't have to wait for it to come from the database. This reduces delays waiting for the database and the network that connects it.
2.The other programs that need to access the database run faster because there is less load on the database and less traffic on the network.
According to the benchmark tests, buffering a table can cause a select statement to run 10 to 100 times faster or more.
The next question that SAP had was, whether to allow all the tables to be buffered or not. Obviously we all would say ‘Yes’. However, buffers are stored entirely on RAM, so space is limited by the amount of RAM available. In fact, there is so much more data than there is RAM, that tables must be buffered with caution to prevent overruns. If a buffer overruns, it might swap to disk, which can eradicate any performance gained by buffering. So SAP has developed this concept in such a way that each individual table can be configured to be buffered or not. But the tables containing a numeric data type as the primary key cannot be buffered
Buffering can be activated through the technical settings of any table. The following screenshot shows table T001, which has been activated to be buffered.

How does this concept work?
When an ABAP program issues an open sql statement, the application server will first check whether the table has been activated to be buffered or not, if the table has been activated to be buffered, the server will check the RAM for the buffered data.
If the buffer is available, the program will read the data from the RAM else it will read it from the database, populate the buffer and subsequently read from the buffer.
I think this post should have given you a basic idea about the table buffers. Definitely this concept improves the performance of the system, but we have to take certain facts into consideration when we try to activate the table buffer on any table. On my next post I will talk about the implications of table buffers in a more detailed way. As well as I will take a look at the multi application server environment and the table buffers.
Please send me your comments.
Wednesday, November 23, 2005
The concept of Data dictionary on SAP – For functional consultants
Most ERP systems store the configuration, transaction and master data in the database. But SAP has gone one step further and even stores the Program source codes in the database. It’s called SAP Repository. I’ll explain how the programs are being executed by the ABAP processor of the work processes, on a later post.
So as you can see, SAP has to deal with database heavily. As well as SAP has to allow the customer to enhance it’s capabilities, according to the business requirements, which may be done by modifying or creating various database objects such as tables, views and indexes. If SAP allows the customer to directly deal with the underlying database, it may lead to unnecessary problems and even lead the system to an unstable position. As well as it will not be possible to track the changes done to the database.
By taking all those into consideration, SAP has developed its software with a concept of ‘Data dictionary’. You can imagine the data dictionary as a mirror image of the actual database objects, which is part of the SAP itself, where the structures of the database objects such as tables have been replicated. For example every table in the actual database would have a corresponding table structure in the Data dictionary. ABAP programs will deal with the data dictionary objects which intern will connect to the actual database objects. For example if you check the table T000, which stores the client information.
The data dictionary object will look like the image shown below.

The details of same table on the actual database are shown below.
 In addition, Data dictionary works like a remote control to the actual database. Developers create the database objects on the data dictionary and activate them; in the background the system will automatically generate the corresponding SQL statements and create the objects on the actual database.
As a strict rule the developers would never create or modify database objects such as tables directly on the actual database, in case if some one has created or modified a database object directly on the database, there is no way that the data dictionary could synchronize with the database object, which will lead to unnecessary problems and may affect the system performance and stability.
We can create objects such as Tables, Structures, Views, Data domains and Data elements on data dictionary. As well as SAP provides various tools to check the consistency between the database and data dictionary objects. I will look at each of those in detail on my future posts.
Please feel free to send me your comments.
Monday, November 21, 2005
Change the parked accounting document
Define Field Groups for Documents
Step one:
First we have to define the field groups. We can use the ‘Define Field Groups for Documents’ activity on SPRO
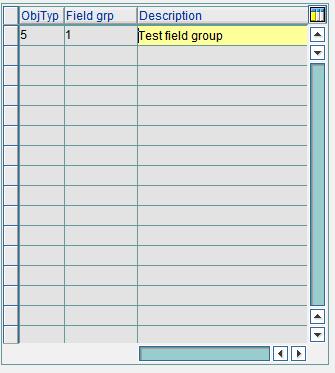
Select the object type as ‘Parked documents’. Please note that we can apply the same logic to other documents such as ‘Documents’, ‘External documents’. ‘Sample documents’, ‘Recurring documents’ and ‘Documents with preliminary postings’
Enter a Field group as a two digit numeric value and type a Description.
Step two:
As the second step we have to group the document fields. Use activity ‘Group Document Fields’ on SPRO to perform this step.

Select the object type as the ‘Parked documents’. Select the Field group that we have created in step one and assign the desired fields.
Step three:
As the next step we have to assign the field groups to the Roles which will then be assigned to the users. Every user can be given authorization to change fields in one or more groups. This means that a user may either change all or no fields of a document. The classification of the fields into groups should be carried out with this in mind.
Execute transaction code PFCG to maintain the roles. Select the desired role and add the desired field groups to the Authorization object ‘F_SKA1_AEN’
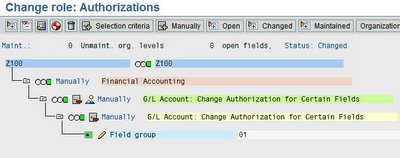
Bingo!!! That’s it. Now the users with the role Z100 attached to them would only able to modify the fields ‘Exchange rate’ and ‘Fiscal year’ on the parked documents while the others would not be able to modify any fields at all.
Field groups can also be used to filter the data on report ‘RFBABL00’ (‘Display of changed documents’)
I hope this post would have helped you to understand how SAP even allows us to control the access to each and every field on the documents. I strongly believe this flexibility with SAP is the main factor which makes SAP as the number one ERP in the world.
Please don’t hesitate to send me your comments.
Sunday, November 20, 2005
Automatic table history
Step one:
Activate the ‘Log data changes’ option on the technical setting of the selected table. By default this option would be activated for tables such as T000 (Client), T001 (Company code) by SAP.

Now you may ask me if the automatic table recording has already been activated for tables I mentioned above, why system gives the following error message when try to view the change documents using SCU3
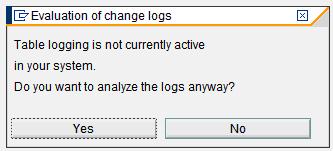
Yes we have to do one more step to activate the automatic table history functionality on a given client.
Step two:
Maintain the client number, for which we want to activate the automatic table history, against the parameter ‘rec/client’ on the application server profile.
Bingo now we are ready to go. Now we can use transactions SCU3 to view the change documents.
Ok now let me explain how exactly this works. Every time when you perform an ‘Insert’, ‘Delete’, or ‘Update’ statement on an ‘Automatic table history’ activated table, it will maintain a log on the change document table ‘DBTABPRT’. Check the following screen shot to see the structure of the table ‘DBTABPRT’

Details such as Table name, Date of change, Time of change, Host name, Person who has changed, Transaction code that has been used to change, ABAP Program name, Type of the operation (whether is it insert , delete or update) and the data change will be recorded on the table DBTABPRT. Later when we use transaction code SCU3, it will fetch the data from this table and display the change documents.
But it’s not possible to activate the automatic table history to a table where the length of the primary keys is more than 86 bytes and the length of non primary keys is more than 500 bytes.
As well as consider the fact that activating the ‘Automatic table history’ may slow down the database operations since all the tables with the above option activated need to access the table DBTABPRT to update the change documents and which may lead to table locks. So it’s advisable to activate the 'automatic table history' only on the tables which are really crucial.
Please send me your comments about this post.
Saturday, November 19, 2005
Parallel Accounting on MySAP Financials
First we have to define the ledgers according to the number of standards on which we have to maintain the accounts. For maximum flexibility we can define one ledger per standard. But always consider the fact that we are going to duplicate the database entries per ledger for each double entry. So I advise that if you feel that there are standards which are pretty similar, use only one ledger for those similar standards.
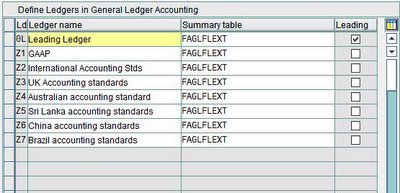
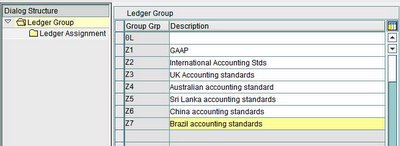
There should be at least one leading ledger. Along with that we can define any number of non leading ledgers to satisfy our needs. When we define ledgers, system will automatically create ledger groups on a one to one relationship to the ledgers.
A ledger group is a combination of ledgers for the purpose of applying the functions and processes of general ledger accounting to the group as a whole. When posting, for example, we can restrict the update of individual postings to a ledger group so that the system only posts to the ledgers in that group. We can group the ledgers into the ledger groups with a representative ledger from which the system will determine and check the posting periods for that ledger group during postings.
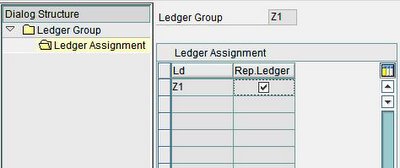
After we have defined the ledgers we can specify the parallel currencies on which we want to maintain the accounts on leading and non leading ledgers for each company code. You can have up to three currencies per ledger per company code. But the non leading ledgers can only be maintained on the currencies that specified for leading ledger. But note that you don’t have to maintain non leading ledgers on all leading ledger currencies.
Another interesting functionality is that you can even specify different fiscal year and posting period variants to the company codes for the non leading ledgers than the leading ledger.

Even we can control how other components like ‘Cost Center’, ‘Consolidation’, ‘Business Area’, ‘Profit Center’, ‘Segmentation’ and ‘Cost of Sales Accounting’ will update the ledger by assigning the necessary scenarios to ledgers. A scenario determines which fields are updated when postings are received from other application components. We cannot define our own scenarios. For example we may only update the leading ledger with the cost center details while keeping the other ledgers untouched. This gives the ultimate flexibility to manage the trade off between the database performance and the financial information requirements.


We can add additional fields to the summery table and capture information that cannot be captured by the existing fields on the summery table FAGLFLEXT. Again we can assign the fields to the ledgers like we do to the scenarios as I explained above. I’ll talk about how we can assign additional fields to the summery table FAGLFLEXT on a different post.
My SAP financial even allows us to maintain multiple planning versions per ledger. For example we can use scenario planning techniques by defining different planning versions for individual ledgers which I feel really useful to the managers on this highly unpredictable business environment.

After we defined the ledgers and the ledger groups we can define the accounting principles on SAP system and assign them to the ledger groups.

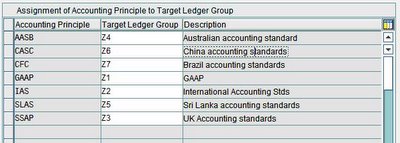
Once we have carried out the above activities the next step would be to create the accounting document types and their number ranges for entry view. The important point I want to stress at this time is that we have to define number ranges for the accounting documents specific to the non leading ledger groups too. And we cannot use the same number range object we used for the leading ledger. The reason is when we post documents to a specific ledger group if we have the same number range assignment as leading ledger; it will create number gaps on the leading ledger accounting documents. So system will not allow you to specify the same number range object of leading ledger to be assigned to the non leading ledgers.

When it comes to Document types for general ledger view, we don’t have to do anything for leading ledger since in the case of this ledger, the document number in the entry view always corresponds to the document number in the general ledger view. We only have to make these settings for any non-leading ledgers that have a fiscal year variant that differs in at least one company code from the fiscal year variant of the leading ledger in this company code. In this case, the document number in the entry view does not correspond to the document number in the general ledger view and we have to define a separate document type with document number assignment for the general ledger view.
These are the basic settings that we have to do in order to carry out parallel accounting on MySAP Financials. Now we can use transaction codes FB50 and F-02 to post double entries into all the ledgers and transaction codes FB50L and FB01L to post double entries to selected ledger groups. We can generate the financial statements per ledgers when we need them.
This is a basic idea about how we can configure parallel accounting on MySAP Financials and hope that this post has given you a good idea about some of the new SAP general ledger functionalities. Please feel free to send me a comment.
